Sanding Resin – Tutorial and helpful tips for epoxy resin surfaces
This post may contain affiliate links. We may earn a small commission from purchases made through them, at no additional cost to you.
After curing, epoxy resin work-pieces are not quite “finished”: without sanding the surfaces, in many cases they do not yet have the gloss that they could actually have. In this article, we explain to you which materials you can use to sand epoxy resin, and also what you need to consider.
Table of Contents
Possible Problems when Sanding Resin
During curing, the initially liquid casting resin transforms into a very hard material after the specified curing time. It is therefore not at all easy to sand the surfaces of the completely dried work-piece. Due to the hardness of the resin, the abrasive paper used sometimes becomes dull very quickly. In general, the structure of sandpaper suffers greatly under the effect of the resin, so that it must be cleaned frequently or replaced quickly. To reduce the material consumption of the sandpaper, we recommend wet sanding of epoxy resin surfaces.
Tip: You should only wet sand your cast resin work pieces when they are completely dry. As a rule, you should therefore wait at least 2 days after casting. It can’t hurt to consult the manufacturers’ labels of the products you use for information on the exact curing time. After all, there are also products on the market that take much longer than 48 hours to cure completely.
Wet Sanding or Dry Sanding?
Based on our experience, we recommend that you give use wet sanding with water-resistant sandpaper, rather than dry sanding. There are several good reasons for this: The abrasive paper used for wet sanding usually lasts much longer than that used for dry sanding. The sanding process also removes minor unevenness immediately, and much less dust is produced in the air due to the moisture. Due to the binding of dust in the water, the respective condition of the surfaces is more visible during wet sanding than during dry sanding and can therefore be easily assessed at any time.
However, there may be exceptions where dry sanding gives better results. For example, we recommend dry sanding for work-pieces that are partly made of wood or similar moisture-sensitive materials. The water used for wet sanding would make the wood swell unattractively and cause unsightly stains.

Nevertheless, there are a number of other reasons that will favor wet sanding over dry sanding. Dry sanding with a random orbital sander (but also sometimes when sanding by hand) generates a lot of frictional heat. If this heat exceeds a certain value, the resin surface may be loosened, resulting in an unattractive matt surface.
If this is the case, it is difficult or even impossible to restore the shine to this damaged resin surface. With various products available on the market, this critical temperature point can vary greatly in amount or depth. Therefore, you should ideally play it safe if you are in doubt and decide to use wet sanding. After all, this method always generates considerably less heat than dry sanding.
Last but not least, the factor of dust formation also plays a role that should not be underestimated. In dry sanding, this dust is not bound by water, but is mostly swirled in the air. However, the dust generated during epoxy resin sanding is considered carcinogenic. For this reason, you should always protect your health when dry sanding by wearing a protective mask.
Wet Sanding of Epoxy Resin
Pros
- In wet sanding, a significantly better result can usually be achieved than you can with dry sanding. The water used rinses abraded material particles off the surface. This also protects the abrasive paper and makes it last longer.
- During wet sanding, virtually no dust is released into the air that could be inhaled. This technique is therefore preferable to dry sanding for health reasons alone.
Cons
- During wet epoxy resin sanding, the dust produced is absorbed by the water used. To prevent this dirty water from causing damage, you should cover your workplace with a protective plastic sheet or with a sturdy tarpaulin.
- As wood can swell undesirably due to moisture, work-pieces with wooden parts integrated in the casting resin should not be sanded by wet sanding if possible. Other materials which swell in contact with water, similar to wood, are not suitable for wet sanding either.
What are the Characteristics of Waterproof Sandpaper?
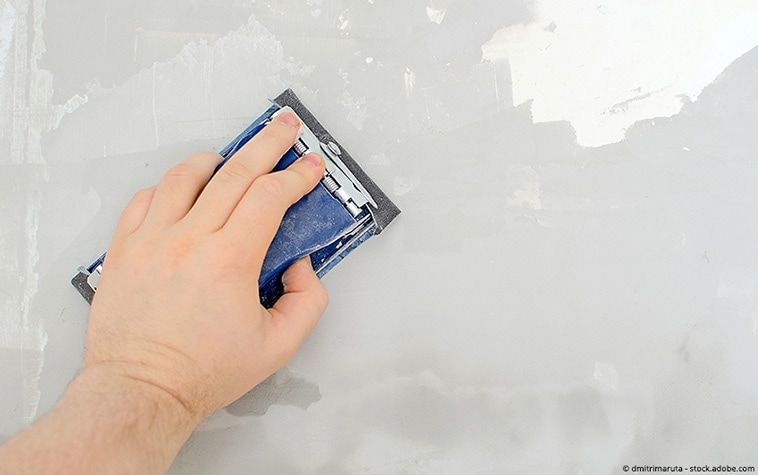
To be able to sand resin by wet sanding, you first need water-resistant sandpaper. This special sandpaper is made of a closed layer of silicon carbide. You can get the waterproof sandpaper in grits between 60 and 4000, but a very coarse grit can leave quite deep scratches in the material when sanding cast resin, which are very difficult to remove.
Therefore, when sanding epoxy resin, you should start with grit 120 and then slowly work your way up to a finer grit. Polishing epoxy resin is when a fine polishing paste with very fine particles is finally used. With this you can give your work a particularly elegant shine.


Important Tips for the Wet Sanding Process
The wet sanding of epoxy resin is mostly done by hand. You are playing it safe if you avoid using electrically operated sanding equipment with this method. Under no circumstances should you run the risk of suffering a dangerous electric shock from the water used. An alternative for working on larger surfaces is, however, a sander driven by compressed air.
As an aid for wet sanding, we recommend the use of a sanding block made of hard rubber. With this block you can keep the sandpaper nice and smooth while sanding. However, if the surfaces to be sanded have a curved shape, you should use a suitable backing. If you do not want to use a sanding block or pad, you can also place the abrasive paper in a suitable position in your hand before moistening it.
Waterproof sandpaper unfortunately has the property of being rather rigid and difficult to bend. This is particularly problematic if you want to use it to work on the possibly quite irregular or even structured surfaces of sculptures and similarly complexly shaped pieces made of epoxy resin. On these surfaces it is usually difficult to change the shape of the abrasive paper to fit the curves in the material. However, suitable alternatives are also available for such cases: with a sanding pad that can also be used wet, such as the 3m Scotch Brite, you can also work on this type of project without much difficulty.
For wet sanding you should provide a sufficiently large water tank as close as possible to your workplace. Hot water can also be used if the ambient temperature is very cold. For epoxy resin sanding with water, you should use the sandpaper to sand the resin surfaces in a regular circular motion, dipping the special sandpaper into the water frequently. When sanding epoxy resin, the grit should only be changed to the next finer grade when no traces of the previous grit are visible on the resin surface.
It is not absolutely necessary to immerse the abrasive paper in a water container to constantly re-moisten it. Alternatively, you can moisten the surface of the sandpaper with the help of a water-filled spray bottle.
In addition, you should regularly wipe off the sanding residues bound in the water with an absorbent cloth when working. This will also give you a much better view of how the resin is being sanded. At the very least, when changing to a finer grained sandpaper, the resin surface must be cleaned, otherwise the coarser grains of sand from the previously used sandpaper can cause new sanding marks.
Tip: When finishing your sanding work, you should wipe off the sanding residues sticking to the work-piece as soon as possible. After drying, it is much more difficult to remove them from the surfaces.
Afterwards you can use a paper towel to prepare the dry cast resin surface perfectly for further steps like painting or an additional protective layer of epoxy resin. If loose particles still adhere to the work piece, they can be removed with a paper towel or by sweeping with a fine broom. It is essential to use a paper towel for this purpose, as a cloth could sometimes soil the surface again.
In case of an immediate application of paint after sanding, it is worth using an electrostatic dust cloth. This prevents negative influences on the final result by effectively removing even the smallest dust particles.
Dry Sanding of Surfaces
Dry sanding offers advantages over wet sanding in terms of effort and time required when relatively large areas are to be processed, for example for Epoxy Resin Tables. Dry sanding should also be chosen if you want to process epoxy resin and wood. We advise you to use a commercially available random orbit sander for dry sanding.


- Dry sanding produces a lot of dust, which can be toxic if inhaled. Therefore, to protect your health when dry sanding epoxy resin, you should always wear a breathing mask. In addition, you should also carry out the work in a well-ventilated workplace.
- When dry sanding epoxy, start with a 200 grit size and work your way up to a fine 1000 grit size (or higher).
Dust abrasion can quickly dull the abrasive paper during dry sanding. However, with a rubber stick designed for this purpose, you can clean the sandpaper and use it for longer. - Before changing the grit used, you should have completely removed any visible sanding marks from your work piece.

Tip: For a truly perfect surface with an impeccable shine, it is essential to polish the epoxy resin with at least a 1000 grain. When sanding with coarser grains, only half satisfactory gloss effects can be achieved.
Amine Blush – Wax on the Resin Surface?
It can sometimes happen that when epoxy resin hardens, a layer forms on the resin surface that feels slightly sticky and like wax. This phenomenon is generally referred to as amine blush. The formation of such a layer is usually caused by significant temperature fluctuations during the drying phase. The amine blush may sometimes be relatively difficult to see with the eye, as its appearance may change.
Amine blush is most noticeable in humid and rather cool air conditions when it can be felt and seen as a dull or greasy layer on the surfaces. The good news, however, is that the resin under the amine blush is generally undamaged. Nevertheless, this amine blush must be removed in any case, as the waxy and unpleasantly sticky consistency makes sandpaper dull very quickly.

Amine Blush can be effectively removed with these Agents:
- Amine blush should be relatively easy to remove with a little warm, soapy water, and a sponge.
- More stubborn layers can be removed with a cloth and commercial spirit.
- A layer of amine blush can also be removed by wet sanding.
Reasons for Removing Amine Blush
In principle, a layer of amine blush has no harmful effect on the cured casting resin. However, the sticky layer should definitely be removed if you want to further refine your work piece with a coating of epoxy resin or with special paint. If you do not remove the amine blush, the substances used as a coating cannot bond with the cured resin with sufficient stability.

Larissa Meyer is a 32-year-old mother from Michigan and creative spirit since childhood. Her passion for painting and drawing has led her to an education as an illustrator and a career as a freelance graphic designer. She has a Bachelor of Fine Arts in Illustration and a degree in Graphic Design. Larissa is a talented artist who is able to master a wide range of styles and techniques to bring her artistic vision to life. Her greatest passion is currently fluid painting and epoxy resin art. Larissa’s love for art and her knowledge and experience in illustration make her the perfect Creative Director for our fluid-painting.com team. She is the creative head of our team and shares her passion and knowledge with our community through articles and tutorials.
As a mother of a 2-year-old daughter, Larissa also understands the importance of fostering creativity in early childhood. She uses her experience and knowledge to help other parents inspire their children and develop their artistic skills as well.
Learn more about Larissa Meyer and about us.