Resin Art – Step by Step Tutorial for Your Epoxy Art
This post may contain affiliate links. We may earn a small commission from purchases made through them, at no additional cost to you.
In this blogpost you will learn everything about creating fine art with epoxy resin. We’ll tell you what resin actually is, and what you have to consider when working with it. In addition, you will get a detailed step by step tutorial for creating your first resin artwork.
Table of Contents
- 1 What is Resin or Epoxy Resin?
- 2 What is Resin Art?
- 3 Required Supplies
- 4 Safety Precautions when Working with Resin
- 5 Calculating the Required Amount of Epoxy Resin
- 6 How to Make Resin Art – Step by Step Tutorial
- 7 Casting Further Layers
- 8 Repair Damages in Your Resin Art
- 9 Cleaning the Tools
- 10 Sealing Resin Art with Epoxy Resin
- 11
- 12 Tips and Tricks
- 13 Inspirations for Your Epoxy Art
What is Resin or Epoxy Resin?
In artistic terms, resin refers in particular to epoxy resin. This is used to create art objects and consists of a two-component system, the resin and the hardener. The components are mixed together, which leads to a chemical reaction after a short time – the mixture then hardens.
After hardening, it can be further processed in various ways. For example, it can be sanded or polished and even painted. It is even food safe, even though many manufacturers refrain from certifying it – mainly for financial reasons, because certification is quite expensive.
Resin is a particularly versatile material that is not only used in art. Boat builders, carpenters and jewelry manufacturers also swear by its durability, ease of processing and numerous design possibilities. It is also weather-resistant and has high adhesive properties on numerous surfaces.
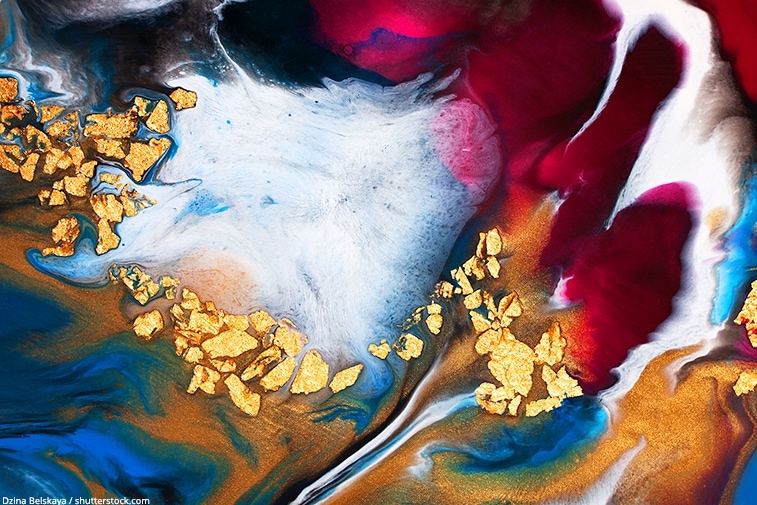
Apart from that, unique pieces made of epoxy resin are a real feast for the eyes. The material has a smooth, clear surface and can be used in many different ways in arts and crafts.
What is Resin Art?
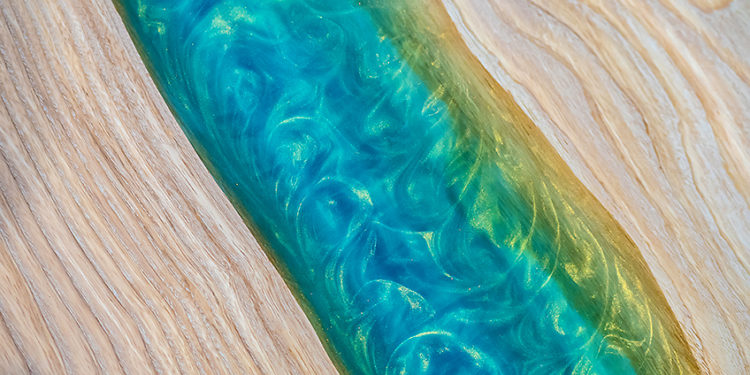
Resin Art describes the art form of creating art objects with epoxy resin. The term refers to all facets of this art. Resin can be used to design paintings, as well as to produce varnishes, resin jewelry, petri dishes and various other castings of any kind.
The latter is also known as Resin Casting. Beside classical clear castings you can also include in your cast all kinds of objects like natural materials, stones, glitter and many other things. The artist can really let his imagination run wild. The results are beautiful art objects that are as unique and individual as the artist himself.

Required Supplies
To start with resin art, you need some specific materials and equipment. When choosing your resin you should also not be too frugal. It is worth investing in a high-quality resin from well-known manufacturers – cheap epoxy resins are often not crystal clear but milky and yellow afterwards. It would be very annoying if your painstakingly cast painting looks cloudy after a few weeks and loses its color brilliance.
We recommend the following materials for your start with Resin Art
Best Resin for Resin Art

- Specifically designed for art projects, excellent color stability
- Very easy to use with 1 : 1 mixing ratio, 100% solids, hard-shell finish
- High gloss and crystal clear, your all-seal solution, excellent air release

- Specifically designed for art projects, developed with professional artists
- Heat resistant, scratch resistant, food safe, maximum UV resistant, water resistant
- Compatible with alcohol inks, acrylics, silicone oils, metallics, dyes, pigments
Epoxy Resin pigments and color pastes


Painting and surface preparation


It is important not to use canvas as a painting base, because the resin is too heavy for this. It would run together in the middle and let the canvas sag, so that the result is undesirable. Suitable painting surfaces are wood, plexiglass, glass or metal. Also various household objects like cutting boards and wooden bowls can be refined with epoxy resin. Even pieces of furniture such as tables and kitchen worktops can be covered with resin.
As far as colors are concerned, you are relatively free to choose. Online you will find a wide range of resin paint which is suitable for epoxy resin art. You can use liquid colors, pigments in powder form, as well as airbrush colors. Be careful not to dilute or mix your paints with water. This would lead to an insufficient hardening of the resin and make it cloudy. You should always mix the colors directly with the resin in a cup before use.
Safety Precautions when Working with Resin
An important point when working with resin is that you protect your surroundings sufficiently. This means that you lay out large areas of protective foil to protect the floor, unless you work in your own studio where you don’t care how it looks afterwards. With epoxy resin art, it is quite possible that something will spill. Since the material solidifies relatively quickly and is really hard afterwards, it is very difficult to remove it from floors and furniture. So, protect the areas that are not going to be covered with resin with a protective foil or several layers of newspaper.
It is also very important to air the room well. Your skin and eyes should also be protected from contact with the epoxy resin, as liquid epoxy resin is a toxic material. (Hardened and cured, it is however completely harmless)
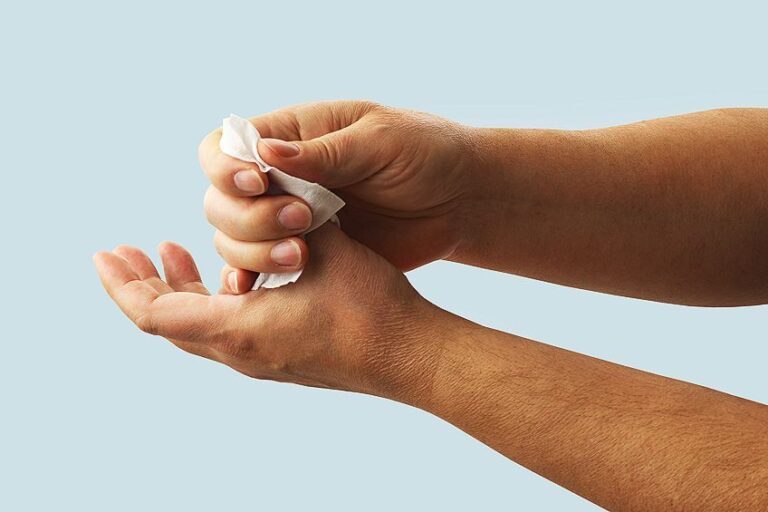
Therefore wear disposable nitrile gloves (NOT latex gloves!) and long-sleeved clothing. If resin gets on your skin, clean it immediately with vinegar and then again thoroughly with soap and water. Smoking, eating, and drinking in the immediate vicinity of resin paint and resin should be avoided. Always wear respiratory protection and safety goggles when working with resin.
Tip: Do not mix too much epoxy resin in a container, so that it does not spill over the edge when working.


Calculating the Required Amount of Epoxy Resin
Before you start working with resin, it is a good idea to calculate the amount of resin needed. We recommend our resin calculator for determining this. To make sure that you have enough resin available in case of spills or premature hardening, you can round up the calculated amount.
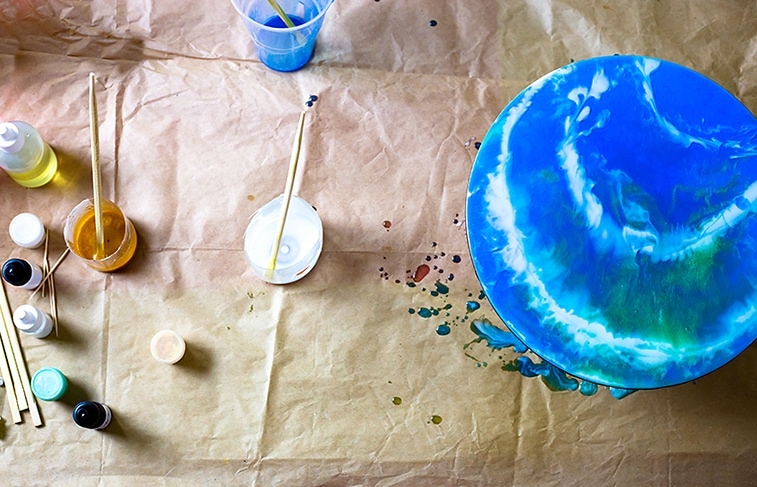
How to Make Resin Art – Step by Step Tutorial
To dare to approach a new painting technique or art movement without knowing the art is often associated with an uncertainty. If you do not succeed, this leads to frustration and sometimes even to abandoning the chosen art form. Here you will find a detailed step by step resin guide to help you get started with your first resin artwork.
Preparation of the Workplace and Painting Base
- Before you start, you should remember to set up your workstation thoroughly. It is therefore essential to have all the necessary materials and equipment ready before you start, so that you can then concentrate fully on creating your work.
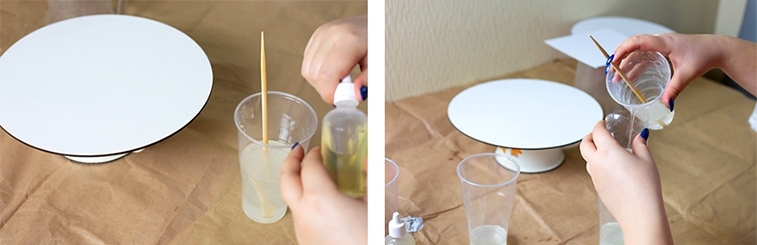
- The preparation of the painting base is also part of the art with resin. To make it easy to remove it from the underside of the finished painting, you can cover it with masking tape. This can be easily removed after drying and with it the hardened resin that has run over it. It is up to you whether you want to mask the sides as well or not.
- Now you should place the painting base on a raised surface so that the resin can harden well and your painting base does not stick to the foil or newspaper afterwards. Use for example four upside down cups or glasses. Use a spirit level to make sure that the painting base is completely even and has no tilt, otherwise your still slightly liquid mass will run during drying and your painting will, worst case scenario, not be recognizable after hardening or will fail completely.
Thoughts on Resin Painting Composition
- Besides preparing the materials, another aspect of preparation is essential: Think carefully about the composition of the resin painting. Especially with resin painting it is very important to know beforehand roughly how your artwork should look once finished. Because the processing time for epoxy is not infinitely long, you should already have a possible idea of your painting in advance. Remember, once mixed, epoxy resin can harden quite quickly.
Mixing and Coloring Resin
- Many highly viscous resin types, which are used for fine resin art, are mixed together in a ratio of 1:1. Make sure to mix resin and hardener by volume and not by weight. To stir, use either a plastic spatula or spoon and stir for at least three minutes until both components are mixed together very well. Otherwise, there is a risk of insufficient hardening of the compound.
- Also be careful not to mix too much resin at once. This is because epoxy resin has a limited working time between 30 minutes and 1.5 hours. (This varies depending on the brand and manufacturer of the resin.) If you mix too much epoxy at once, you may run the risk of the resin hardening before your painting is finished.
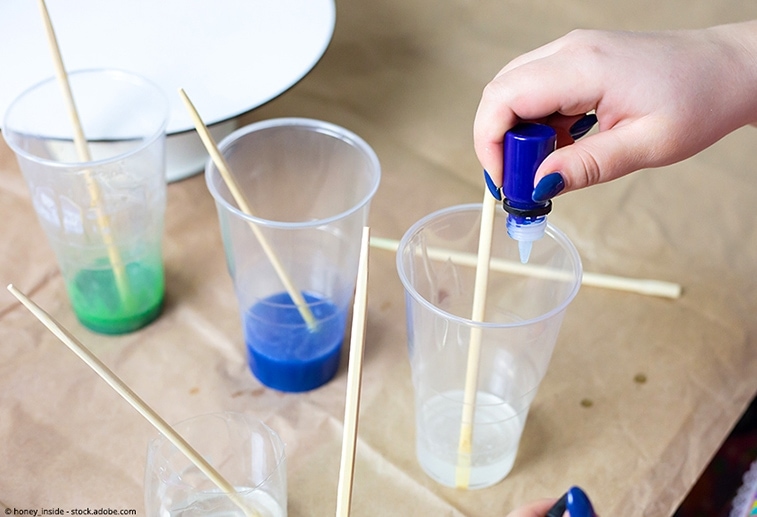
- After mixing you can color your resin. Pour it into several different plastic cups and add a few drops of liquid resin paint or half a knife point of pigment. Be very sparing with the paint, because usually a very small amount is enough. Work slowly until the desired color intensity is reached.
- If you want to create cell formation, you can also add some silicone oil or Resi Blast to some color cups. The latter has been specially developed for epoxy resin art.
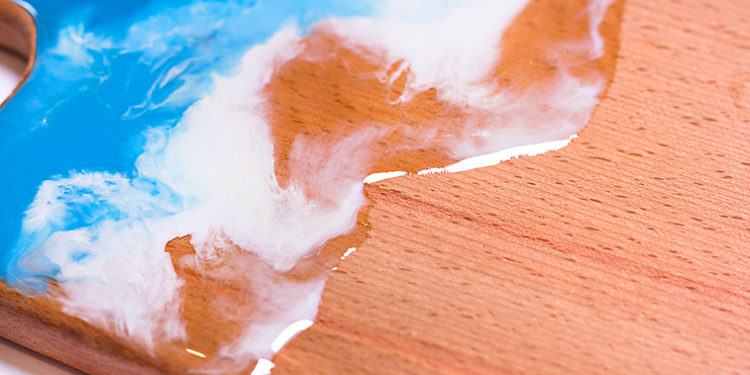
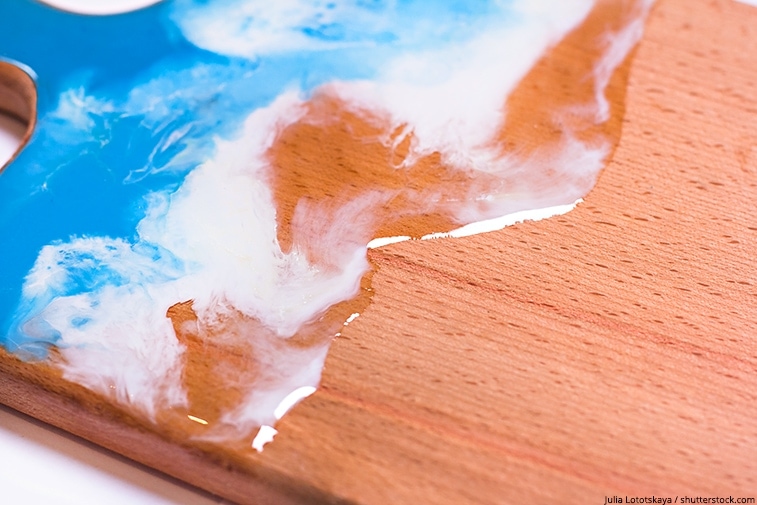
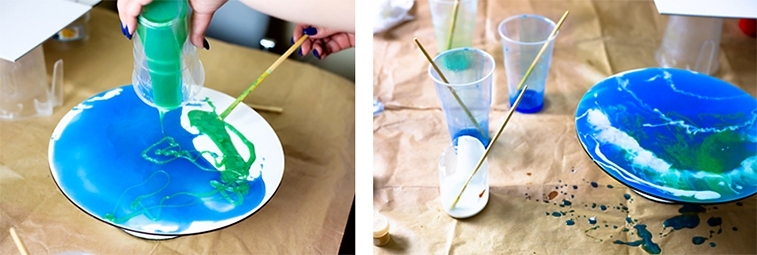
Casting the Resin Painting
- Now you can give your creativity free rein. Use the cups for one of the usual acrylic pouring methods, for example the Puddle Pour or the Flip Cup. Knock yourself out and design your artwork according to your personal taste. Tilt the painting surface or spread the paint using various utensils such as a painting knife or spatula.
- If you discover air bubbles, use the hot air dryer or the butane torch to burst them by heating them very briefly.

- Once the resin starts to dry on the painting surface, you should not try to make the resin flow. Do not tilt the painting and do not fiddle with a spatula or other utensils. Otherwise the resin might pull threads and the surface might get dents. If you need more working time, you can easily extend it with heat. Use a Bunsen burner or hairdryer for this purpose.
- If you find particles in your resin art that do not belong there, for example dust, you can remove them carefully with tweezers.
- Now let the painting dry. Place a cardboard box or a laundry basket over it. It is important that the painting is protected as much as possible from dust and other particles floating in the air. Otherwise they could settle on it and create unsightly effects.
Casting Further Layers
Even Resin Art paintings with one layer of resin look very noble. Additional layers, however, give the paintings a very special depth. To apply an extra layer of resin to your painting, you must first let it dry for about five hours. At this time the resin is a little bit sticky, but is already a little hardened. If you want to apply another layer of resin when the first one is already completely dry, you have to sand it a little bit first so that the fresh resin can bond well with the lower layer.
Repair Damages in Your Resin Art
After your resin art has dried, you may discover some defective areas, such as slight dents or even holes. This is caused by insufficient coverage with the epoxy resin and occurs if you have used too little resin. Sometimes defects also appear if too much resin has run down the sides of the painting ground. Silicone oil and Resi Blast can also promote the formation of dents.
If you have discovered any flaws, you will have to sand the painting. Use a fine grain and proceed very carefully. Then you can apply a new layer of epoxy resin. If you have used silicone oil or Resi Blast, you should also clean your resin artwork with alcohol before you water it again.
Cleaning the Tools
As soon as you have finished your work, you should clean your tools such as spatula, painting knife, hot air dryer and tweezers. Clean them thoroughly with a cloth soaked in vinegar or isopropanol. Attention: Always disconnect electrical appliances from the mains first!
You can place the mixing cup on a piece of foil with the opening facing downwards. This allows the remaining resin to flow down and can be easily separated from the cups after about 12 hours. If you have used a foam roller and brush, they cannot be cleaned and must unfortunately be disposed of.

Sealing Resin Art with Epoxy Resin
Resin can be used not only to pour out molds or create paintings, but also to seal or finish the latter. With it you can cover your artwork with a protective and shiny varnish and preserve its color intensity. It also gives your works of art a very special brilliance and depth.
Do you have a painting on canvas, and want to seal it? Then proceed as follows:
- Protect your workplace and prepare it as described above. Think also about your own safety.
Cover the areas you do not want to seal with masking tape. These could be the edges or the bottom of your canvas, for example. - When finishing, it is also important that your painting surface is level. Use a spirit level and place your painting base on four cups.
- Mix your components and stir carefully. But of course leave out the paint! After all, the resin should be transparent.
- Pour the resin in the middle of your painting and spread it evenly, for example with a spatula. Also think about the edges of the painting! Let the epoxy resin run to all the edges and spread it with the spatula or simply with your fingers (please wear gloves!)
- If air bubbles have formed, use the hot air dryer or the butane torch and heat the surface of the painting briefly. Be careful not to blow for too long on one spot.
- After 30 minutes (depending on the resin brand it can also be longer) the curing phase starts. Before then, your processing must be completed. Also remember to cover the epoxy art for up to 24 hours when sealing it, otherwise dust or other particles could settle on it.
Tips and Tricks
- Use simple plastic vessels with a measuring scale for mixing. With this you can easily measure resin and hardener. They are of course more expensive than normal plastic cups, but the investment is worth it. However, make sure to clean the containers immediately after use so that you can reuse them.
- Don’t just put the utensils near your work space, but also put them in the order in which you need them. Especially if it is your first painting with casting resin, you must make sure that every tool is in place after mixing. Remember that the so-called pot life, i.e. the time in which the resin can be processed, is limited.
- Watercolors and oil paints should not be mixed with resin, as these affect its consistency and can make the resin milky. However, you can, of course, use these colors first, let them dry and then give your painting a resin finish afterwards. This makes your painting special and makes it shine for a long time.
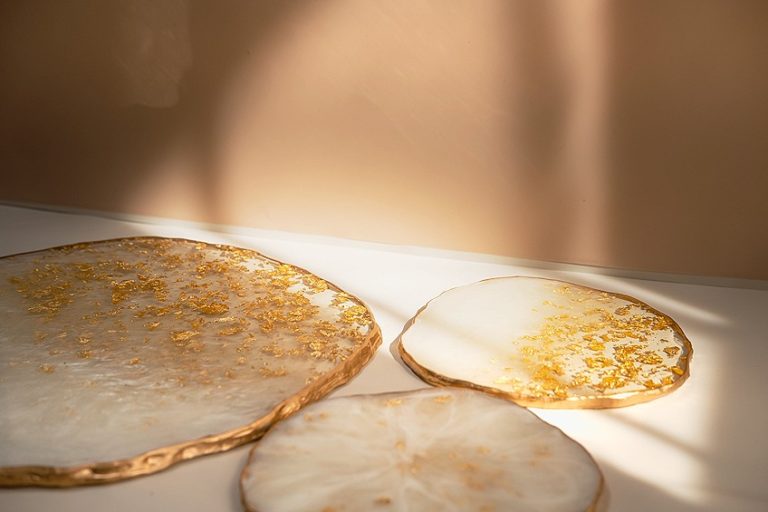
Inspirations for Your Epoxy Art
With the help of silicone molds and resin you can not only cast beautiful objects, but also jewelry, coasters and petri dishes. These can also be designed as you wish. A great example is resin casting, where objects such as dried flowers are embedded in the resin. Or how about Petri Dishes, in which you add a few drops of alcohol ink? The result is a real eye catcher! For small Petri Dishes you can also use the resin residues that accumulate in your painting.

Why not use a tabletop as a painting base? From a simple table, epoxy resin art can be used to conjure up a unique designer piece. All you have to do is cover the table top with colored resin. Make sure to tape or smooth down the edges to avoid unsightly drops or veins. You can also embed various objects into the surface. Alternatively, stick photos onto the table top and cover it with crystal clear epoxy resin. You can also use it to finish kitchen work surfaces.
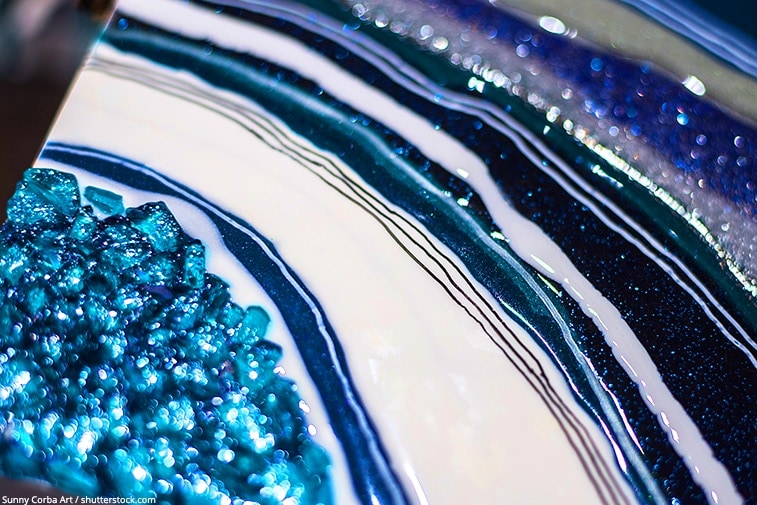
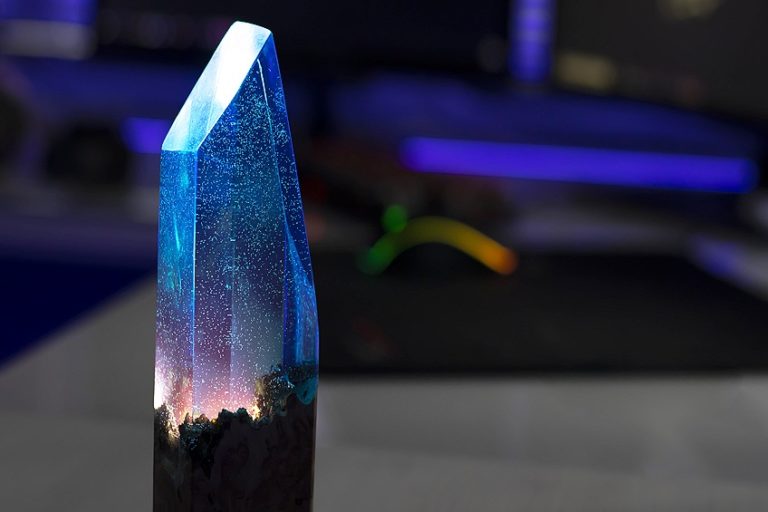
Advanced artists may try their hand at creating a geode artwork. To do this, you use a painting base, which you prime and then cast in circles or lines with differently colored epoxy resin. You can also add glitter or stones to the resin, or place them in the cast, still liquid resin. You can let your imagination run free. Look out for our post on the production of geodes, coming soon.


To work with Epoxy resin is complex and can be expensive – but it is worth it. Once you have gained a little experience, it will be easier for you and you will create breathtaking works of art that will inspire every viewer!

Larissa Meyer is a 32-year-old mother from Michigan and creative spirit since childhood. Her passion for painting and drawing has led her to an education as an illustrator and a career as a freelance graphic designer. She has a Bachelor of Fine Arts in Illustration and a degree in Graphic Design. Larissa is a talented artist who is able to master a wide range of styles and techniques to bring her artistic vision to life. Her greatest passion is currently fluid painting and epoxy resin art. Larissa’s love for art and her knowledge and experience in illustration make her the perfect Creative Director for our fluid-painting.com team. She is the creative head of our team and shares her passion and knowledge with our community through articles and tutorials.
As a mother of a 2-year-old daughter, Larissa also understands the importance of fostering creativity in early childhood. She uses her experience and knowledge to help other parents inspire their children and develop their artistic skills as well.
Learn more about Larissa Meyer and about us.